Now where did we leave off?
I've heard people say it's a bad practice to not put dates on articles. I used to and then one day just kinda stopped. I don't remember why. I think since most of my site is talking about old video stuff the published dates are unimportant. Does it really matter if some scans of a store catalog from 1992 were posted in 2008 or 2010?
One consequence of this is readers have no idea it's been over a year since I last posted an article about my crazy Sega Genesis programming experiments. I doubt dates matter unless someone a decade from now claims I stole an article from them, even then I suspect web.archive.org can sort it all out. In the past year I've been working on expanding my demo to include a full "overworld" map. There's not much programming involved in that, just tedious (to me) tile creation and scene layouts.
In between creating 20+ locations I managed to code up a couple interesting things. I updated sprite z-ordering for the 1,000th time. I never want to look at that again now so it's not going into an article. One neat thing I wrote over a weekend was palette fading.
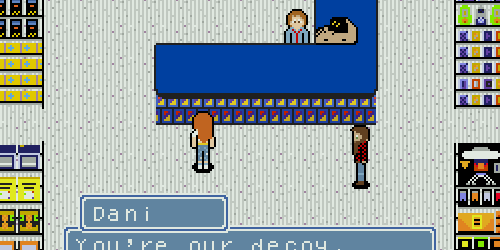
To recap, the demo I'm working on is set in a shopping mall in 1989. I wanted each store to have a distinct look which means they have 3 different palettes. The 4th palette is used for characters. 1 palette from each scene is used for the hallway preview. The hallways then have 1 palette of their own, with the other 2 reserved for store fronts.

I'm not sure if I'd call it a "downside" but one thing that results from this is the player can't continuously walk between scenes. Doing this would require all the scenes, or at least neighboring ones, to share common palettes. There also could be some wacky palette swapping alternative that I'm not smart enough to figure out. Lacking another idea, I have the entire scene transition when the player enters a new location. It's like entering a house in an RPG. In the first demos I just brute-force cut-over from one scene to the next. That looked tacky because graphics would pop-up like girders on Donkey Kong (you can use that reference to date this article if that's important to you). To make it look cooler I came up with some little fade-in & fade-out effects.
Planning it out
Let's review how palettes work in the Sega Genesis.. the color RAM (CRAM) stores 4 sets of 16 color palettes. Each color is represented by a 16-bit word. To simplify, the CRAM is just a list of 64 16-bit words.
The colors themselves are only 9-bit with 4 unused bits and some extra ones to turn shading on/off. I haven't played with shading so I can't explain how that works. The format of each color word is:
FEDCBA9876543210
0000BBBSGGGSRRRS
The leftmost bit in each BGR is the most significant - meaning 100 is brighter than 001. At first I thought fading was really easy - "hey, just do an 'and 0000011001100110' to strip out the high bits then 'and 0000001000100010' and so on" - it turns out that looks terrible, just see why:
0000BBBSGGGSRRRS
0000100000100100
and 0000011001100110
-->
0000BBBSGGGSRRRS
0000000000100100
This changes the palette from a predominantly blue color to a predominantly red color. Taking off the 2nd bit changes it to..
0000BBBSGGGSRRRS
0000000000100000
..which is dark green. So the transition looks awful - blueish to redish to green. What we really need to do is shift the intensity down equally so..
0000BBBSGGGSRRRS
0000100000100100
..changes to..
0000BBBSGGGSRRRS
0000010000000010
..so the colors are in the same balance. And the next right shift takes us to..
0000BBBSGGGSRRRS
0000001000000000
This gives us a nice fade-out from a bright predominantly blue color to a dull predominantly blue color then to a dark blue color. One more right shift turns the color black. Of course it's not that easy, every time we shift bits we risk overflowing colors. After two shifts the lowest bit of blue overflows into the highest bit of red for example. The full order of operations then goes like:
0000BBBSGGGSRRRS
0000111010100110
lsr 1
-->
0000BBBSGGGSRRRS
0000011101010011
and 0000111011101110
-->
0000BBBSGGGSRRRS
0000011001000010
[repeat until 0000000000000000]
Fade-in is then a matter of doing this in reverse order.
One other change I'm making is storing a copy of the scene palette in RAM. This is just because I found it easier to work off a copy in RAM than trying to manipulate the palettes in the CRAM directly. Also the whole "update the CRAM directly" thing works for fade-out but not fade-in. One way or another, fading-in needs a copy of the destination palette in RAM. Or at least I couldn't imagine another way.
Setup
Alright, let's get to writing this. First off we need a couple new constants. The first specifies how long (how many frames) to wait between fade transitions. Swapping palettes can happen in 1/60 of a second, if you want the player to see the effect you need to pause just a little bit. 3-4 frames looks alright, for debugging this value can be 0 or 16 or whatever. We also need a memory location to store the active palette. This needs to have enough room to store 64 words. The value used in this article is completely arbitrary.
FADE_FRAME_DELAY=$0004 ; how many frames to wait between fade in/out

MEM_SCENE_PALETTE=$FFFF01CA ; storing for fade in/out
And there are a few constants you should already know and love by now:
VDP_CRAM_WRITE=$C0000000
VDP_DATA=$00C00000
VDP_CONTROL=$00C00004
VDP_STATUS_VBLANK=$0008
Another set of repeat material is code to wait for a vblank interrupt. WaitVBlank is used for the fade animation delay. WaitVBlankStart is used to update the CRAM while vblank is happening.
WaitVBlank:
 bsr.w WaitVBlankStart ; wait for vblank to start
 bsr.w WaitVBlankEnd ; wait for vblank to end
 rts ; exit
WaitVBlankStart:
 move.w VDP_CONTROL,d0 ; copy VDP status to d0
 andi.w #VDP_STATUS_VBLANK,d0 ; check if the vblank status flag is set
 beq.s WaitVBlankStart ; wait for vblank to complete
 rts ; exit
WaitVBlankEnd:
 move.w VDP_CONTROL,d0 ; copy VDP status to d0
 andi.w #VDP_STATUS_VBLANK,d0 ; check if the vblank status flag is set
 bne.s WaitVBlankEnd ; wait for vblank to complete
 rts ; exit
With all that out of the way it's time to start some new stuff..
Fading the palettes
I decided to tackle this with a set of three loops. The outer-most loop goes from 0 to 3 and is for each fade out sequence. The inner loop goes from 0 to 63 and iterates through each palette entry. I suppose it could use long words and be cut in half. Within the inner loop is another loop that applies the lsr+and instructions. The size of that loop varies based on which fade step we're in.
 move.w #$2700,sr  ; disable interrupts
FadeOut:
 move.w #$0000,d3 ; d3 is the number of times to loop
FadeOutOuterLoop:
 move.w d3,d2 ; d2 will be used as the lsr loop counter
 bsr.w FadeFrameDelay ; fade in/out delay frames
 bsr.w WaitVBlankStart ; wait to load palettes until VBlank starts
 move.l #VDP_CRAM_WRITE,(VDP_CONTROL) ; set up VDP write to CRAM
 lea (MEM_SCENE_PALETTE),a0 ; point a0 to the now previous scene palette
 move.w #$003F,d0 ; 64 words of palette data
FadeOutInnerLoop:
 move.w (a0)+,d1 ; get the next palette entry
FadeOutLsrLoop:
 lsr.w #$01,d1 ; shift bits to the right to decrease color intensity
 ;       0000BBBSGGGSRRRS
 and.w #%0000111011101110,d1 ; prevent color overflow
 dbf d2,FadeOutLsrLoop ; loop until done shifting
 move.w d1,(VDP_DATA) ; write the palette entry
 move.w d3,d2 ; reset d2
 dbf d0,FadeOutInnerLoop ; decrement d0 and loop
 addq #$0001,d3 ; increment d3
 cmpi.w #$0003,d3 ; loop for three shifts
 blt.s FadeOutOuterLoop ; loop until fade is complete
ExitFadeOut:
 rts ; exit
 move.w #$2000,sr  ; re-enable interrupts


FadeFrameDelay:
 move.w #FADE_FRAME_DELAY,d1 ; copy frame delay to d1
FadeFrameDelayLoop:
 bsr.w WaitVBlank ; force waiting for a frame
 dbf.w d1,FadeFrameDelayLoop ; frame delay loop
 rts ; exit
The end result looks pretty alright:

The browns are a little redder than I'd like in the first fade but overall I'm happy with it.
At the end of the fade out the screen is black. So fading in has one less step than fading out. Otherwise it's roughly the same:
 move.w #$2700,sr  ; disable interrupts
FadeIn:
 move.w #$0002,d3 ; d3 is the number of times to loop
LoadSceneFadeInOuterLoop:
 move.w d3,d2 ; d2 will be used as the lsr loop counter
 bsr.w FadeFrameDelay ; fade in/out delay frames
 bsr.w WaitVBlankStart ; wait to load palettes until VBlank starts
 move.l #VDP_CRAM_WRITE,(VDP_CONTROL) ; set up VDP write to CRAM
 lea (MEM_SCENE_PALETTE),a0 ; point a0 to the now previous scene palette
 move.w #$003F,d0 ; 64 words of palette data
LoadSceneFadeInInnerLoop:
 move.w (a0)+,d1 ; get the next palette entry
 tst.w d3 ; is d3 0?
 beq.s LoadSceneFadeInWritePaletteEntry; if d3 is then then done fading
LoadSceneFadeInLsrLoop:
 lsr.w #$01,d1 ; shift bits to the right to decrease color intensity
 ;       0000BBBSGGGSRRRS
 and.w #%0000111011101110,d1 ; prevent color overflow
 dbf d2,LoadSceneFadeInLsrLoop ; loop until done shifting
LoadSceneFadeInWritePaletteEntry:
 move.w d1,(VDP_DATA) ; write the palette entry
 move.w d3,d2 ; reset d2
 dbf d0,LoadSceneFadeInInnerLoop ; decrement d0 and loop
 dbf d3,LoadSceneFadeInOuterLoop ; decrement d3 and loop
ExitFadeIn:
 rts ; exit
 move.w #$2000,sr  ; re-enable interrupts
Both of these effects could be optimized by someone smarter than me. Even I could probably sort it out in enough time. Since the purpose is to pause the game momentarily anyway I didn't consider performance to be a big concern. I could probably also figure out an elegant way for these to be one subroutine.
Next time?
After finishing this little article I'm going back to finish the next mostly stable demo for Retail Clerk '89. Then.. probably no new features for a little while. I need finish up the game script which will likely take me through the end of the year. There's a chance I'll write some kind of status screen thing which would be a cool thing to post an article about if it happens. Until then, or whatever I write next, thanks for taking the time to read these. See you in a year.
Download
Download the latest source code on GitHub
Related