I don't write about Raspberry Pi projects here often, or maybe ever. None of them really made sense to talk about. Setting up Pi-hole was one I wish I did sooner. I didn't write about that because that setup is documented well already. I've also used a couple model 2s to create real-time web site traffic monitoring boards (not for this site obviously). I didn't write about those because they were work-related. I built a dedicated Minecraft player for one of my kids with another Pi. That's a trivial project that didn't seem worth the time to write about.
I have one Pi that's jinxed though. There's this Raspberry Pi 3B with 7" touchscreen that I've tried several different projects on. So far I've been wildly unhappy with all of them.
I originally tried RetroPie on it but it drove me crazy. I spent far more time trying to configure controllers than playing games on it. Each system has its own setup and I grew tired of the hassle. In hindsight that was my fault. I shouldn't have expected that some bit of magical code would figure out how I wanted to map controller buttons for every system. I later tried using this Pi for a calendar/planner project. I scrapped that after remembering how I prefer being disorganized. Then I tried Kodi to use it as a streaming player. It turns out buying the cheapest Kindle Fire is an easier option to accomplish the same.
One thing I enjoy almost as much as giving-up on Raspberry Pi projects is hoarding all these "mini" consoles. NES Classic Mini, SNES Classic Mini, the Genesis one, the C64 one, yes the PlayStation thing, and even the TurboGrafx-16 one. The last being the most useless. I already had almost everything it included from when games were being cleared out for $5. I also imported a ton of CD games before it became a hipster system and absurdly expensive. The game selection on the mini version was a greatest hits line-up that missed all the weird games that made me a fan of the system.
It had a good controller though. They really nailed that. Sure a 6-button controller would be better but it's such a small bit of the library that uses one. I got to thinking that maybe I could use that controller to build my own version of the system. One with my entire CD library and whatever [cough] public domain HuCard games there are.
So that's it - I have an unused Raspberry Pi 3B with 7" touchscreen and a USB TurboGrafx-16 controller. I bet with just one system the RetroPie configuration is easy. There's just a small problem.. fitting all those CD games on a little micro SD card.
The one thing I don't get about RetroPie is their approach to USB support. As of whenever I posted this they have two options:
I know, I could contribute to the RetroPie project and implement what I want there. No need to call me out on that. I am not criticizing the project at all. When I think about it for a minute, each of these approaches seems easier to implement than the alternatives. Trying to manage a configuration where you have potentially dozens (or hundreds) of different rom directories to scan doesn't sound fun.
First off, the basic setup. All these steps are documented in detail on the RetroPie site or elsewhere. I am not including links because I'm positive they will break 5 minutes after I post this.
You are now ready to make your USB drives visible to RetroPie. From here on out this is describing the steps I took to create a dedicated TurboGrafx-16/PC Engine player. So the names of things created reflect that. Change the names of things to whatever you want.
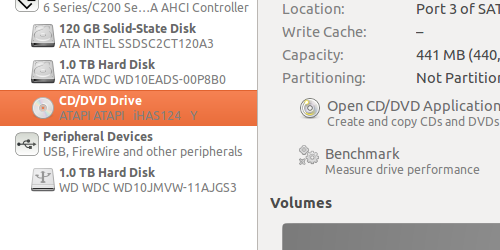
After you connect to your Pi via SSH, or open a terminal on the device directly, cd over to the /media directory. Create one directory for each USB drive you want to connect.
mkdir CD-USA
mkdir CD-Japan
mkdir HuCard
Again, these are the directories for my project. Perhaps you want to create ones called PSOne, Saturn, and Jaguar. The net result should look like this:

Next create symbolic links from each of these new directories to the corresponding directory in RetroPie. In my case, all three need to be visible to the pcengine folder. RetroPie has a hard-coded file structure you need to follow. Here are the commands used in my case.
ln -s /media/CD-USA /home/pi/RetroPie/roms/pcengine
ln -s /media/CD-Japan /home/pi/RetroPie/roms/pcengine
ln -s /media/HuCard /home/pi/RetroPie/roms/pcengine
As a sanity check, open up the target directory and verify the links are there:

We've now tricked RetroPie into looking at these new directories when it scans the pcengine directory. We still need to mount the USB drives to these new directories at boot.
Run blkid to get the UUIDs of your USB drives:

Copy those UUIDs. Not those in the screenshot, the ones from your window. Now run:
sudo nano /etc/fstab
Add these entries (with your UUID and directory names of course) at the end:
UUID=AC1B-9293 /media/CD-USA auto nosuid,nodev,nofail 0 0
UUID=B340-DB94 /media/HuCard auto nosuid,nodev,nofail 0 0
UUID=D898-E8C0 /media/CD-Japan auto nosuid,nodev,nofail 0 0
Here's an example of a file:

Reboot. When you're done, you should now see your drives in RetroPie.

Sorry about the poor quality of that picture. Well, OK, I'm really not. Clicking any of those will list all the games on the USB drive. This is exactly what I wanted. I didn't want to go directly into a giant list of games. I prefer having this top level of organization. I could, and perhaps should, have organized this by genre instead.
By default, save RAM and save states will try to write to the USB drive. This is a problem because the pi user doesn't have write access to them. An easy solution is changing the path if you have extra space on the SD card. 32gb micro SD cards are so cheap that's probably what you used, you're fine.
Start by making a directory under /home/pi/RetroPie:
mkdir saves/pce
cd saves
mkdir pce

[I always do things the long way, for everyone else you can use ]
mkdir -p saves/pce
Now edit the config file for all PC Engine emulators:
sudo nano /opt/retropie/configs/pcengine/retroarch.cfg
And add the following lines:
savefile_directory="/home/pi/RetroPie/saves/pce"
savestate_directory="/home/pi/RetroPie/saves/pce"
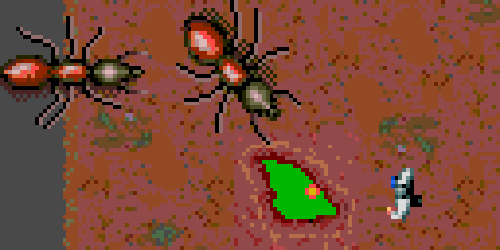
After all this, I can finally enjoy some fine quality 16-bit CD gaming:

So that's about it. In the week or so I've had this setup I definitely enjoy it more than my previous multi-system RetroPie experiment. I will likely install a theme that matches to complete the experience. I may even play around with the "attract mode" add-on to see if I can make it shuffle through CD game intros [note: this does not seem possible after all].