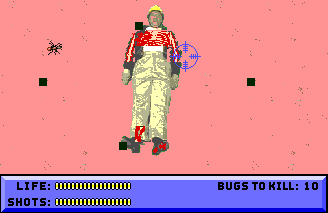
Overhead Battle
Let's start with the easiest mini-game - the overhead ant battle. The objective of this game is to close the entrances to the ant tunnels.
Controls:
- D-pad: Control Buzz
- Button I: Launch selected weapon
- Select: Change weapon
- Button II: Throw grenade
General tips:
- If you run out of weapons you can flee by running off the side of the screen
- There is no time limit for this mini-game, take as much as you need to win
- After you seal the last hole any ants still alive will try to flee, either kill them or let them run off the screen to end the mini-game but don't run off yourself
- When the battle begins, immediately select the dynamite
- You can be killed by your own blasts
- Disable turbo-fire
The grenades are always initially selected. Use these to take out the ants. It's almost impossible to run out unless you leave turbo-fire on.
The dynamite is used to seal the holes. Your supply is limited so don't use it to attack ants unless they're standing over a hole.
Later in the game you can call-in an air strike. I've never found this to be that useful. By the time you arrange where the planes should strike, an ant will usually get to you.
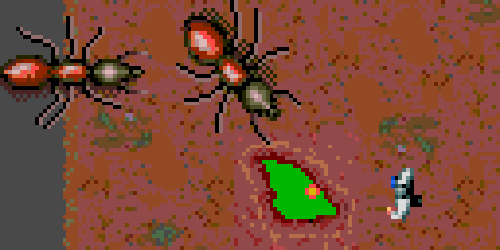
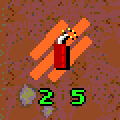
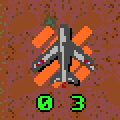
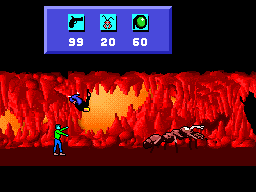
To kill the ants you need to score a direct hit to the body. Here is an ideal distance to be when attacking an ant.
The dynamite doesn't travel far. Here is the ideal distance to be.
The hole
will reopen so you need to stay close. Before going after a hole clear out
any nearby ants. If some cross the hole when the dynamite explodes they'll
be killed - so if an ant has to cross the hole to get to you you're fine.
Any new ants that come out through the hole while you're dynamiting it will also
be killed.
Shooting
Controls:
- D-pad: Control crosshair
- Button I: Shoot
General tips:
- Don't worry about shooting the person, your bullets won't hurt them
- Don't pay attention to how mangled the person looks, the life meter is the only thing that matters
- Disable turbo-fire
This mini-game is a little tougher than the overhead battle but not too rough. Your shots don't need to be precise, as long as any part of the crosshair is on them it'll hit. Whenever possible try to hit multiple ants with a single shot to conserve bullets, later in the game when you're fighting 40+ ants it is possible to run out if you're not careful.
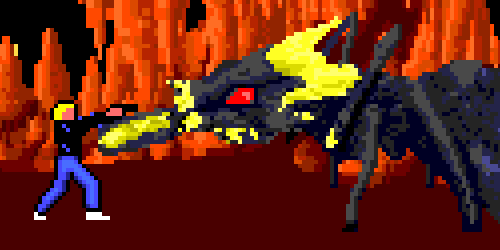
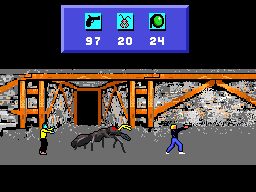
Tunnels
The tunnel mini-game is the most important to master and unfortunately it's also the hardest. You can not win the game without being pretty darn good at surviving in the tunnels.
Controls:
- D-pad: Move Buzz
- Button I: Shoot
- Button I+Down: Place grenade
- Button II: Jump
- Up: Move to next area
General tips:
- Go slowly, enemies can appear quickly and you may run right into one if you're going too fast
- When you enter a new area be ready to hit Up right away, sometimes there will be an enemy waiting and you'll need to make a hasty turnaround
- Don't waste bullets on the zombies if you have time to place a grenade
- If you're running low on ammunition you can go back to a previous area and pick-up more, the ammunition always re-spawns
- Disable turbo-fire
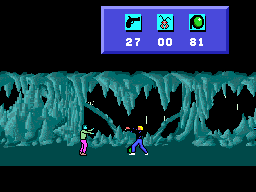
In the beginning of the game you have the ability to do a back flip. When you're standing in the firing position, press Button II to do a back flip. This maneuver is almost always a guaranteed suicide. For example, in this screenshot Buzz will back flip right into the zombie.
Visit the Borax Saloon on the first two days and select strength each time. On day 2 you'll learn the forward flip instead. This will make life much easier.
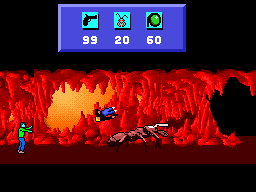
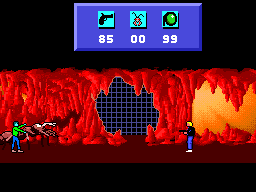
Now when you're facing an enemy, and are standing in the firing position, you can jump over them by pressing Button II. The longer you hold the button the further you jump. For example, in this screenshot the jump was too short.
However, if you keep holding Button II you can practically clear the entire floor.
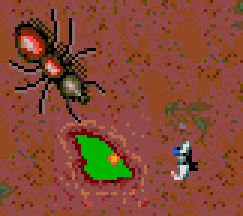
The zombies will drain your bullets, use the grenades on them instead. When you're standing the in the firing position press Button I+Down. You need to be a few steps away because the grenades are on a timer. If you're too close they'll walk right over it.
At the end of the tunnels is a force field. You need to reach the force
field to advance the story of the game but can not get through it at
first. Once you get to the field, allow one of the enemies to capture
you and you'll be put back outside.
See the walkthrough for more on this.

The good news is that when you reach an elevator your progress is saved. If you are captured, the next time you enter the tunnels you will return after the last elevator you went down.
Tags: TurboGrafx-16
Other Sections