
On to the next chapter
I recently finished this little Sega Genesis demo game called Retail Clerk '89. It's not especially fun but I'm not sure that was ever my reason for making it. It lacks 6 button support simply because the game only needs 3 buttons. Really it only needed 2 if I knew what I was doing before I started on it. Still, the X/Y/Z buttons could just mimic their A/B/C counterparts. That would have been kind of neat.
After looking into it I found that supporting 6 buttons isn't as easy as it sounds. It's not rocket science but it's not just testing the controller input for a couple extra values. So that's all this article & demo will be about - reading all 6 (really 8) buttons on a Genesis controller. As an extra bonus we'll try to detect whether a 6 or 3 button controller is attached.
I have a secondary goal - determining whether any part of the Retail Clerk '89 code is reusable in other projects. In case I decide to do another full-blown Genesis game I'd like to have a library of code that solves common problems. Not an engine or a framework, just a random pile of minimally useful code. You could even say It's Definitely not a Genesis Adventure Framework. I guess that means the code for this little 6 button demo is a bit larger than it needs to be.
The first thing I learned from this demo is that I really didn't understand how Genesis controllers communicated with the base unit. I found some sample code that worked and called it a day. At the end of writing this demo that copy 'n paste code was largely replaced.
I never even stopped to think about what the 9 pins on the Genesis controller even mean. I've always been more of a software guy than a hardware guy. After reading several different sources, some with conflicting information, here's what I think the 9 pins on the Genesis controller port mean:

So there are 7 pins that transmit binary data. Since the base Genesis controller has 8 buttons that means Sega had to account for handling >7 buttons from the beginning. This is done by sending data out over cycles. The "TH" pin serves as the toggle here. Flipping it from low to high initiates another read cycle. There are 9 cycles supported but really only the first 7 are used. For a 3 button controller game only the first two cycles are needed. So you flip bit 7 to initiate another read cycle. After a short delay the controller flips back to cycle 0 so you better get what you need quickly.
There are many variations of this chart available, including from leaked Sega development manuals. I created one because I'm not very smart and needed a dumbed-down version to help me understand this:

Yeah, I know, this is just a spreadsheet view of the previous image. You really just came here to see code I bet. Alright, let's get to it..
I'll skip all the stuff to create the layout, you can download the full source somewhere on this page.
Let's start with some constants we'll need:
CTRL_1_DATA=$00A10003
CTRL_1_CONTROL=$00A10009
MEM_CONTROL_1_6BUTTON=$FFFF000A
MEM_CONTROL_HELD=$FFFF000C
MEM_CONTROL_PRESSED=$FFFF000E
MEM_CONTROL_6_HELD=$FFFF0010
MEM_CONTROL_6_PRESSED=$FFFF0012
MEM_DEBUG_CYCLE1_INIT=$FFFF0020
MEM_DEBUG_CYCLE2_INIT=$FFFF0022
MEM_DEBUG_CYCLE3_INIT=$FFFF0024
MEM_DEBUG_CYCLE4_INIT=$FFFF0026
MEM_DEBUG_CYCLE5_INIT=$FFFF0028
MEM_DEBUG_CYCLE6_INIT=$FFFF002A
MEM_DEBUG_CYCLE7_INIT=$FFFF002C
MEM_DEBUG_CYCLE8_INIT=$FFFF002E
MEM_DEBUG_CYCLE9_INIT=$FFFF0030
MEM_DEBUG_CYCLE1_VBLANK=$FFFF0032
MEM_DEBUG_CYCLE2_VBLANK=$FFFF0034
MEM_DEBUG_CYCLE3_VBLANK=$FFFF0036
MEM_DEBUG_CYCLE4_VBLANK=$FFFF0038
MEM_DEBUG_CYCLE5_VBLANK=$FFFF003A
MEM_DEBUG_CYCLE6_VBLANK=$FFFF003C
MEM_DEBUG_CYCLE7_VBLANK=$FFFF003E
MEM_DEBUG_CYCLE8_VBLANK=$FFFF0040
MEM_DEBUG_CYCLE9_VBLANK=$FFFF0042
Right after the Genesis starts let's see what type of controller is connected. This is needed because if a 3 button controller is connected we should skip reading everything after cycle 2.
InitController:
 move.b #$40,(CTRL_1_CONTROL)
 lea CTRL_1_DATA,a0 ; load address to read controller 1 data
 ;---------------------------------
 ; set counter to 1 + TH high
 ;---------------------------------
 move.b #$40,(a0)
 nop ; bus synchronization
 nop ; bus synchronization
 move.b (a0),(MEM_DEBUG_CYCLE1_INIT)
 ;---------------------------------
 ; set counter to 2 + TH low
 ;---------------------------------
 move.b (a0),d0
 move.b #$00,(a0)
 nop ; bus synchronization
 nop ; bus synchronization
 move.b (a0),(MEM_DEBUG_CYCLE2_INIT)
 ;---------------------------------
 ; set counter to 3 + TH high
 ;---------------------------------
 move.b #$40,(a0)
 nop ; bus synchronization
 nop ; bus synchronization
 move.b (a0),(MEM_DEBUG_CYCLE3_INIT)
 ;---------------------------------
 ; set counter to 4 + TH low
 ;---------------------------------
 move.b #$00,(a0) ; set TH low
 nop ; bus synchronization
 nop ; bus synchronization
 move.b (a0),(MEM_DEBUG_CYCLE4_INIT)
 ;---------------------------------
 ; set counter to 5 + TH high
 ;---------------------------------
 move.b #$40,(a0) ; set TH high
 nop ; bus synchronization
 nop ; bus synchronization
 move.b (a0),(MEM_DEBUG_CYCLE5_INIT)
 ;---------------------------------
 ; set counter to 6 + TH low
 ; 6 button id is in counter 6
 ;---------------------------------
 move.b #$00,(a0) ; set TH low
 nop ; bus synchronization
 nop ; bus synchronization
 move.b (a0),d0 ; copy controller data to d0
 move.b d0,(MEM_DEBUG_CYCLE6_INIT)
 cmpi.b #%00110011,d0 ; 00110011 = 3 button controller
 beq.s .1
 move.b #%111111,(MEM_CONTROL_1_6BUTTON)
.1
 [and so on for 7-9]
And now here's the new code to read the joypad. This is executed during vblank. It now is a bit different than the original sample I found a few years ago.
ReadJoypad:
 ;---------------------------------
 ; set counter to 1 + TH high
 ;---------------------------------
 move.b #$40,(a0) ; set TH high
 nop ; bus synchronization
 nop ; bus synchronization
 move.b (a0),d0 ; get joypad data - C/B/Dpad
 move.b d0,(MEM_DEBUG_CYCLE1_VBLANK)
 andi.b #%00111111,d0 ; C/B/Dpad in low 6 bits
 ;---------------------------------
 ; set counter to 2 + TH low
 ;---------------------------------
 move.b #$00,(a0) ; set TH low
 nop ; bus synchronization
 nop ; bus synchronization
 move.b (a0),d1 ; get joypad data - Start/A
 move.b d1,(MEM_DEBUG_CYCLE2_VBLANK)
 lsl.b #2,d1 ; shift them so they are at the 2 highest bits
 andi.b #%11000000,d1 ; Start/A in high 2 bits - clear others
 or.b d1,d0 ; merge values from both registers
 not.b d0 ; flip bits so 0 means not pressed, and 1 means pressed
 move.b d0,d1 ; copy current buttons to d1
 move.b (MEM_CONTROL_HELD),d2 ; copy the last previously read buttons
 eor.b d2,d0 ; flip buttons being pressed now
 move.b d1,(MEM_CONTROL_HELD) ; store held buttons
 and.b d1,d0 ; AND with current buttons
 move.b d0,(MEM_CONTROL_PRESSED) ; store pressed buttons
 ; if this is a 3 button controller skip the remaining steps
 move.b (MEM_CONTROL_1_6BUTTON),d0 ; save the value
 tst.b d0 ; is this zero?
 beq.w ExitReadJoypad ; zero means 3 button controller
 ;---------------------------------
 ; set counter to 3 + TH high
 ;---------------------------------
 move.b #$40,(a0) ; set TH high
 nop ; bus synchronization
 nop ; bus synchronization
 move.b (a0),(MEM_DEBUG_CYCLE3_VBLANK)
 ;---------------------------------
 ; set counter to 4 + TH low
 ;---------------------------------
 move.b #$00,(a0) ; set TH low
 nop ; bus synchronization
 nop ; bus synchronization
 move.b (a0),(MEM_DEBUG_CYCLE4_VBLANK)
 ;---------------------------------
 ; set counter to 5 + TH high
 ;---------------------------------
 move.b #$40,(a0) ; set TH high
 nop ; bus synchronization
 nop ; bus synchronization
 move.b (a0),(MEM_DEBUG_CYCLE5_VBLANK)
 ;---------------------------------
 ; set counter to 6 + TH low
 ;---------------------------------
 move.b #$00,(a0) ; set TH low
 nop ; bus synchronization
 nop ; bus synchronization
 move.b (a0),(MEM_DEBUG_CYCLE6_VBLANK)
 ;---------------------------------
 ; set counter to 7 + TH high
 ;---------------------------------
 move.b #$40,(a0) ; set TH high
 nop ; bus synchronization
 nop ; bus synchronization
 move.b (a0),d0 ; get joypad data - x/y/z/mode
 move.b d0,(MEM_DEBUG_CYCLE7_VBLANK)
 not.b d0  ; flip bits so 0 means not pressed, and 1 means pressed
 and.b #%00001111,d0 ; x/y/z/mode are in lowest 4 bits
 move.b d0,d1 ; copy current buttons to d1
 move.b (MEM_CONTROL_6_HELD),d2 ; copy the last previously read buttons
 eor.b d2,d0 ; flip buttons being pressed now
 move.b d1,(MEM_CONTROL_6_HELD) ; store held buttons
 and.b d1,d0 ; AND with current buttons
 move.b d0,(MEM_CONTROL_6_PRESSED) ; store pressed buttons
 ;---------------------------------
 ; set counter to 8 + TH low
 ; just for demo purposes - not needed
 ;---------------------------------
 move.b #$00,(a0) ; set TH low
 nop ; bus synchronization
 nop ; bus synchronization
 move.b (a0),(MEM_DEBUG_CYCLE8_VBLANK)
 ;---------------------------------
 ; set counter to 9 + TH high
 ; just for demo purposes - not needed
 ;---------------------------------
 move.b #$40,(a0) ; set TH high
 nop ; bus synchronization
 nop ; bus synchronization
 move.b (a0),(MEM_DEBUG_CYCLE9_VBLANK)
 ;---------------------------------
 ; done reading controller
 ;---------------------------------
ExitReadJoypad:
 rts
Here's what the final product looks like:
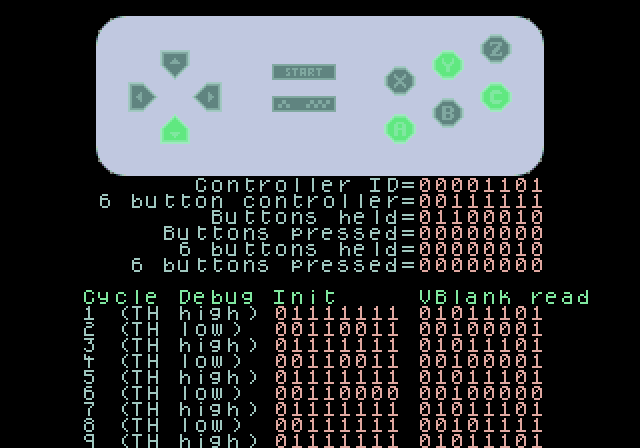
It's handy for verifying what exactly is sent during each cycle - see what I mean:
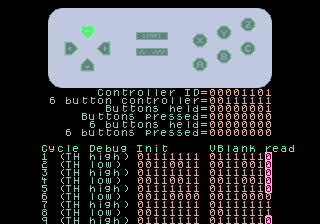
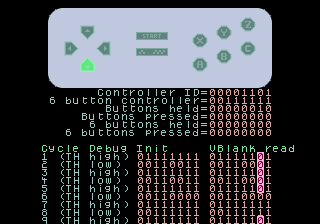
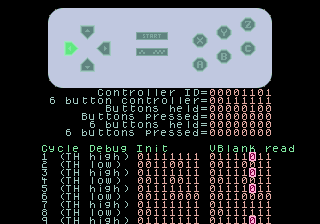
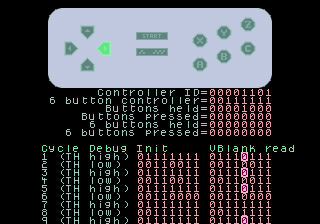
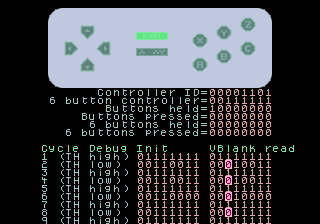
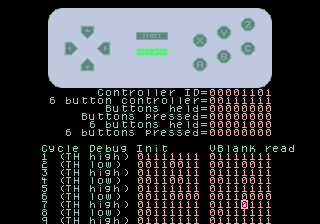
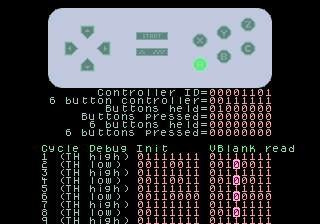
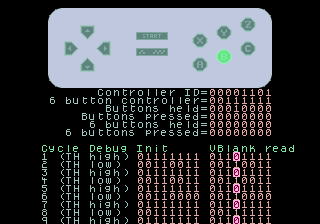
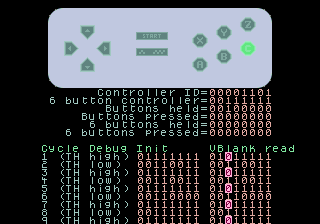
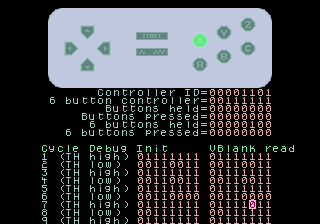
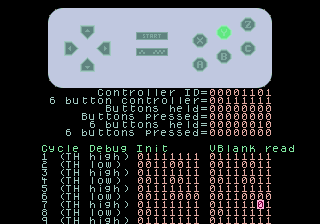
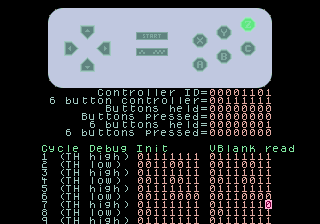
Please note - the red boxes were added for illustrative purposes and don't appear in the demo ROM.
After testing this with various things, here's a chart I'm calling "why Sega Genesis programming will turn you into a crazy person":
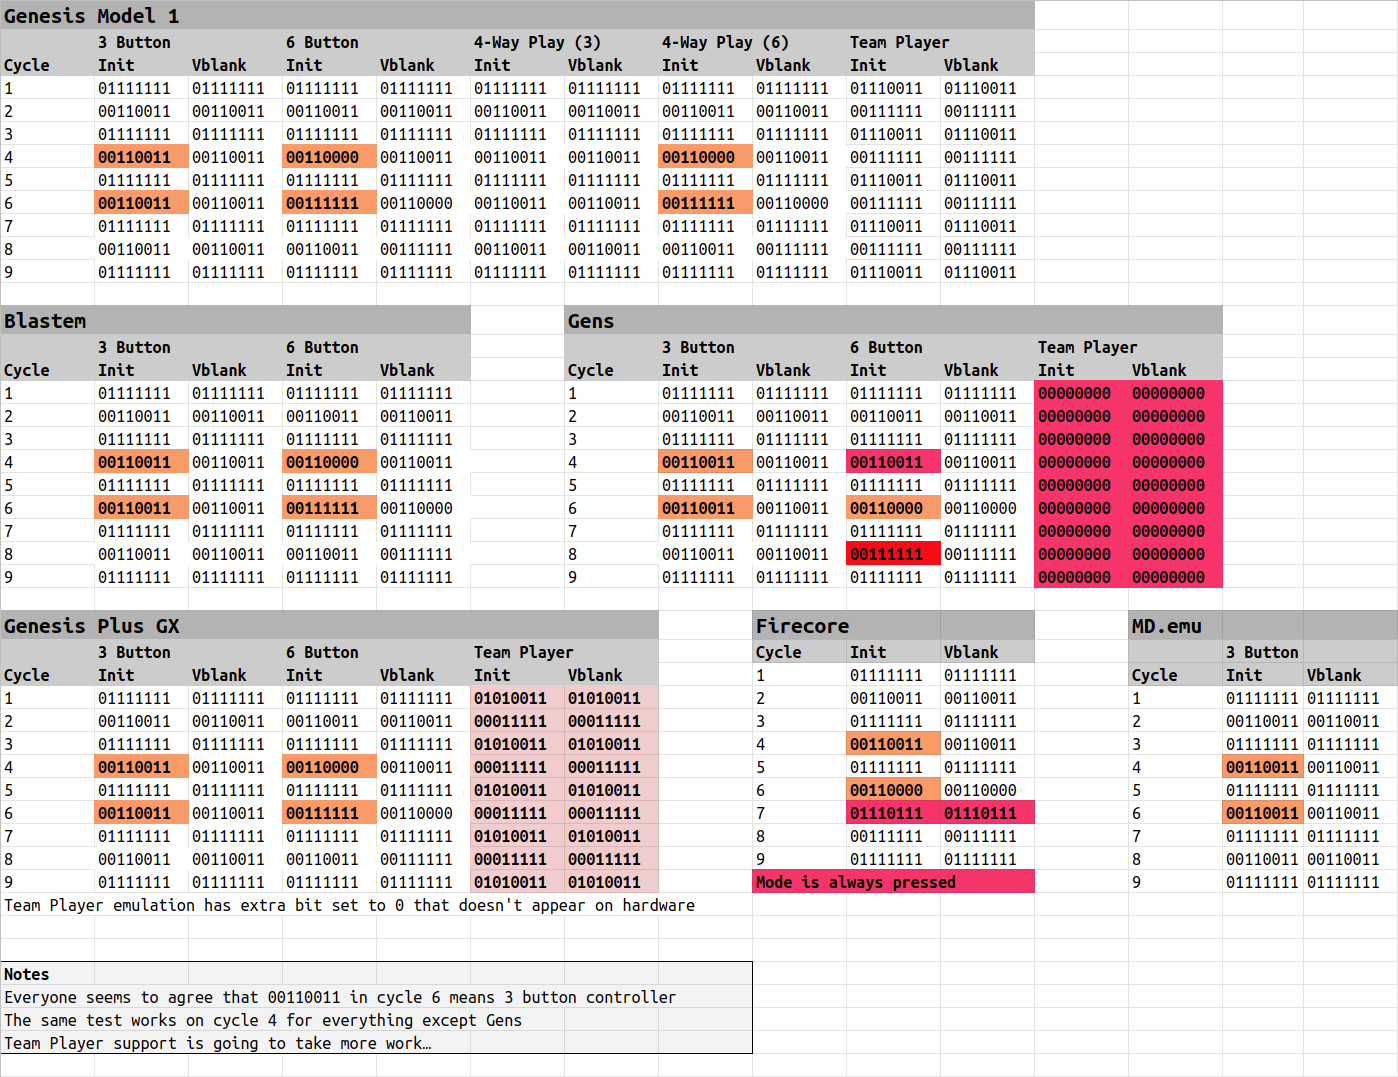
The part that's really messing with my mind is how reading the controller during initialization (shortly after passing the Genesis "security" step) produces different results than reading it during vblank. Trust me, I tried to rule out that I was doing something wrong. I tried copying & pasting identical code into both places and got the same result.
Cycles 4,6,8 just flat-out produce different results for 6 button controllers at very-near-startup vs during normal game play. Since 3 button controllers don't behave this way it must be something different in the 6 button hardware. I know that the mode button must be pressed during startup to flip the controller into 3 button mode. It doesn't flip it every time it's pressed, I'm sure this confused people badly. I have to assume then that during this brief period the 6 button controller is in a different state.
There are two other important things this illustrates:
1) Gens is a fun emulator and all that stuff. It's fast and will run any crazy thing you throw at it. Anecdotally I've never built a test ROM it won't run. The tradeoff to this is it's not an especially accurate emulator.
2) The mode button can be used like a regular button but you risk having issues on clone systems. I get it. Some clone systems have hardwired 6 button controllers and need to be compatible with the small assortment of games that break with them. Rather than include a mode button, which might be confusing to non-hardcore-Genesis-people, they implemented a novel solution. They made the mode button constantly pressed. It's an interesting workaround. So games explicitly looking for the mode button would find it I guess? That's not really how the mode button is intended to work, it's meant to be detected by the controller hardware and not game software. How could a game that predates 6 button controllers be expected to look for it? There are no commercial games that use mode like a regular button so nothing breaks. I'm just not sure this makes anything work either.
What's Next?
I think next I'll try to decipher Team Player support. I own two of them so maybe I'll really lose my mind and try to figure out how 8-player support might work.
Download
Demo ROM - this turned out to be pretty handy for testing controller configuration on emulators
Source code - at least until I move it to Github
Related