Overview
Ys III is not the most beloved in the series. The style change from Ys I&II, difficulty, and relative brevity are frequent targets of criticism. It's sometimes called a Zelda II or Castlevania rip-off. In reality Falcom had been working on side-scrolling action RPGs for years, with Popful Mail really nailing the formula in 1991. The soundtrack and overall story of Ys III both hold-up well today. They were each left mostly intact for the Oath in Felghana remake. The original versions of the game are rough compared to the remake. If you've never played any Ys game before, or only played newer ones, then you are much more likely to prefer Oath in Felghana.
I wonder who is going back to try Ys III today? I revisited it specifically to write this guide after feeling inspired by Falcom's various 40th anniversary plans. I suppose nostalgia and curiosity about early Ys games is the driving force for playing it now (whenever "now" is to whoever is reading this).
There were four console ports produced - PC Engine CD/TurboGrafx-16 CD, Mega Drive/Sega Genesis, Super Famicom/Super Nintendo, and Famicom. The latter of which did not have a US release but has a fan translation. This page will cover the four console ports. For the sake of completeness I could add the original PC-88 version to this page, it's more work than I care to tackle right now. Same for any of the other Japanese PC ports.
The four console ports are almost identical in terms of area layout. There are some differences in terms of boss strategy and target levels. I will attempt to explain them all here.
This guide was produced using emulators of course. Before you give me grief for that allow me to interject:

For some reason the Mega Drive version of Ys III is stupidly expensive. That's one of the missing pieces in my Ys collection. The other three Japanese imports are all obtainable for ~$10 each. The TurboGrafx-16 version is probably stupidly expensive now too. I bought it for $15 in 1994 which you'll see whenever I add a "receipt pr0n" gallery to this site. I've had the Genesis and Super Nintendo versions long enough to forget where & how much I got them for.
It's hard to say which port is the "best" because there are subjective differences. The Famicom port is of course technically the weakest but being a fan translation it follows the Ys canon the best. My very rough understanding is that some portion of the text translation was done by the same person who later did the official Oath in Felghana translation. The Super Nintendo version has a translation that's close to canon. It also adds some songs that don't fit very well and the renditions of Adol & Dogi in cut-scenes are just weird. The graphics are generally kind of blah in the Super Nintendo version though. The difficulty level is also rage-inducing.
The Genesis and TurboGrafx-16 versions appear to be based on the same oddball translation. They changed the names of locations and characters for no obvious reason. Hudson handled the TurboGrafx-16 port and they aren't even consistent with their re-naming of Dogi in their Ys I&II port. So to a US player in the early 1990s with no knowledge of the Ys story, which was likely the case, it's confusing. Adol is rescued from the dungeon in Darm Tower by "Colin". At the end of Ys II they talk about leaving together. In Ys III Adol is traveling with "Dogi" instead. The intro scene shows them leaving the land of Ys so it must be the same character right? Unless you played the Sega Master System port of Ys you had no way of knowing that the TurboGrafx-16 port used a different name for Dogi. Yet the TurboGrafx-16 port has great cut-scenes, voice acting, and by far the best soundtrack. It's hard to disregard it.
At the start of writing this I can't really say which is my favorite. After powering through all of them I'll do a final ranking at the end.
The screenshots will be in the same order listed above: TurboGrafx-16 CD, Sega Genesis, Super Nintendo, and Famicom. This is just the order I played them in. There are a couple spots where I missed a screenshot and went back later to grab them. This means you might see 1-2 screenshots where Adol is at the maximum level early in the game.


Along the way we'll be looking at some differences in cut-scenes & dialog. This is not a comprehensive guide to the differences, I'll try to cover the important or interesting things.
This is not spoiler-free. I don't spoil plot elements early though. If you only scroll to wherever you are in the game then you'll be fine. I have a strong suspicion the only people trying Ys III today already know the basic story or have played Oath in Felghana.
Introduction
Let's start by looking at the introductions.


The TurboGrafx-16 version begins with a re-telling of past events. This is missing from the other versions. Due to the goofy translation the intro confuses the past hero with Adol. I can't understand how that happened since the two characters look nothing alike.
The Genesis version will show up in a minute, I tried to synchronize similar screenshots where I could.
The Super Nintendo version breaks out the Mode 7 graphics to zoom in on Adol & Dogi walking through a market. It's a good start to the game so far.
The Famicom version pays tribute to the prior games in the series, which also had Famicom releases.


The past hero in the TurboGrafx-16 version really needs to rethink their armor strategy. This artwork is very reminiscent of a D&D illustration.
On the Super Nintendo the team checks out the market, still looking good..
The artwork on the Famicom version is great here. I still haven't played the fan translations of Ys I&II on the Famicom and that feels like it should be a 2021 goal.


The Sega Genesis and TurboGrafx-16 versions have a title screen with the same never-ending walk through columns with text explaining Adol's backstory.
On the Super Nintendo we now have the worst rendition of Adol ever. Yes, I've seen the Sega Genesis box art. This is worse. He looks like a vampire.
The Famicom version then has a lead-in to the logo.


The intros diverge a bit. The TurboGrafx-16 version has the most scenes but doesn't follow the story in the other 16-bit versions.
The Sega Genesis and Super Nintendo versions both tell the same story but in a different order. They both involve Adol & Dogi meeting a fortune teller and fighting off a large cat. I realize the writing staff at Falcom has changed since the late 1980s but they still often include a fortune teller in their games. I guess it's a common but not standard JRPG trope.
The TurboGrafx-16 version opens with the closing events of Ys II. Adol and Dogi are getting ready to set sail. Hudson is assuming that Ys III players finished the previous games on the same platform. On the Genesis and Super Nintendo that would be a bad assumption. The Genesis version starts with Adol and Dogi planning their next move.


In the TurboGrafx-16 version we also say goodbye to Lilia from Ys II.
In the Genesis version there is a visit to a market but this is not where they meet the fortune teller.
On the Super Nintendo the crystal ball begins to break.
The Famicom version introduction ends here with the logo.


The TurboGrafx-16 version has another title screen here.
The Genesis version goes back to the previous artwork.
On the Super Nintendo the fortune teller warns Adol & Dogi about Galbalan.


The TurboGrafx-16 version has Adol and Dogi taking in some scenery. Their general style hasn't changed much over the years.
On the Genesis they stop a mountain lion attack.
The next screen on the Super Nintendo is similar to the previous screen on the Genesis.


The next scene in TurboGrafx-16 version is also similar to the forest scene on the Genesis.
Meanwhile on the Genesis we get our first look at Elena.
On the Super Nintendo Adol suggests visiting Redmont.


On the TurboGrafx-16 it's near nightfall and it doesn't seem they brought a tent. This seems like poor planning.
The Genesis version transitions to the fortuneteller scene.
On the Super Nintendo version Adol & Dogi continue their journey.


On the TurboGrafx-16 we have mountain climbing reminiscent of Breath of the Wild.
On the Genesis we have one of the greatest typos in video game history.
On the Super Nintendo they begin heading toward Redmont.


On the TurboGrafx-16... wait, let's go back to the last picture.. here's an awesome idea that will never happen - an Ys game in the style of Breath of the Wild set between Ys IV and Ys III (which from a game timeline standpoint occur in that order).
In the Genesis version the fortune teller's vision turns dark.
On the Super Nintendo Adol is attacked by a generic wildcat. This is different than the Genesis version where they are rescuing someone else.


In the TurboGrafx-16 version we see Elena.
In the Genesis version Adol & Dogi arrive at the town of Sarina which is what Redmont was renamed to for reasons. This is the end of cut-scenes on the Genesis.
On the Super Nintendo, Adol deals with the wildcat quickly and brutally.


The TurboGrafx-16 version has the leads playing with forest animals.
On the Super Nintendo Adol wonders why this wildcat was aggressive.


They reach Dogi's hometown at the end of the TurboGrafx-16 and Super Nintendo introductions. These are very similar, it's like we're seeing the same scene but from different angles.


Dogi re-introduces himself to an old friend. Right away there are two signs the TurboGrafx-16 and Sega Genesis versions are based on the same translation. 1) The town is called "Sarina" instead of "Redmont". 2) The guard is named "Jetai" instead of "Gardner".
These four ports were by four different companies and there's no obvious overlap in the staff. How the Genesis and TurboGrafx-16 ended-up with the same alternate translation is a puzzle.


In the TurboGrafx-16 and Genesis versions Dogi explains his history with the town.
Redmont/Sarina
Reminder - "Redmont" is the canon name of the town. In the TurboGrafx-16 and Genesis ports it's called "Sarina". In the official soundtrack for the game the BGM here is called "Trading town of Redmont" so you don't even need to look at the original Japanese text to figure this out.
Once in control start making your way to the town entrance. It's not required to talk to everyone but you pick-up some hints.


For example, you can learn about the missing miner whose name varies across the ports.


At the entrance you'll learn that the mayor is trapped in the mine. There are a lot of people getting trapped in mines throughout the Ys series. Go to the weapon shop and buy the basic sword, armor, and shield before exiting the town. You should have enough left over to also buy a healing herb, which is oddly called "harb" in the Genesis version.
Tigray/Tigre Mine
There is a map screen to travel between locations you've heard of. There's just one for now.


In the first area there are no enemies and Adol heals automatically. All the areas you travel to in Ys III work like this.


Head over to the mine entrance.


If this is your first time playing, and I assume it is, then use this initial room to get accustomed to the controls. There are both ground and flying enemies so you can practice all the attack types.


The kind of frustrating thing about Ys III is that you will pretty much be destroyed in each new area until you level up. When you get to a new location you'll usually spend 10-30 minutes grinding in the first room until you can survive.
In the TurboGrafx-16 CD version you should get up to level 5 fairly quickly. In the Sega Genesis version level 3 is the highest you can reach without investing a couple hours. On the Super Nintendo you'll cap at around level 4. On the Famicom you can only gain one level in a short amount of time because there are fewer enemies.
A huge difference I noticed in the Super Nintendo version right away is the enemy respawn time. Enemies respawn the second you scroll back to one. Flying enemies infinitely respawn and are infinitely annoying.
Meanwhile, on the Famicom there are generally not many enemies around and they don't always respawn.


The next room has four exits. You enter through the top left. Drop down to the bottom left exit.


Go through the passage.


Get the power ring. The door can't be opened yet.


On the Super Nintendo version you'll need to fight the enemies at the bottom of the mine for a while until you're up to level 6. Even at level 6 your chances of survival aren't good.


Head straight across to the bottom right exit.


The cave is really a straight line from here. The enemies aren't much tougher at first.


You'll reach a staircase. You can continue to the right a little but there's nothing there.


The next floor is a little more difficult.


The enemies on the ground will do a decent amount of damage. Crawl and attack to avoid getting hit.


There is a treasure chest with Roy's/Robert's/Bob's pendant. You'll need to give this to his mother but don't backtrack just yet.


Head down the stairs.


There will be a scene where Chester attacks one of the miners.


The miner gives you the storehouse/warehouse key which is used to unlock the door in the top right exit of the second room (the large one with four exits).


Since you have to backtrack anyway, this is a good time to return to town and give Roy's/Robert's/Bob's pendant to his mother. She will give you the shield ring. Also this is good time to buy herb/harb if you need it because there is a boss fight coming up.
The shield ring is most useful in the Super Nintendo version. In the other three versions you are better off with the power ring for most boss fights as you'll be able to win before taking too much damage. On the Super Nintendo version the power ring doesn't boost your attack all that much and the boss fights take longer. The shield ring is more useful in most situations then.


You should have enough gold to upgrade your armor now in the Genesis and TurboGrafx-16 versions. This is essential in the Genesis version but you can wait in the TurboGrafx-16 version.
On the Super Nintendo and Famicom versions you probably won't have enough money for any upgrades just yet.


Go back to the mine and head to the top right room.


If you have been leveling-up then this boss is easy. Equip the power ring and attack him from the ground. In the TurboGrafx-16 version his projectiles will usually go over you. In the others you'll be able to survive a few hits. On the Super Nintendo the shield ring is a better pick for this fight.


You'll receive the long sword which you should equip immediately.


Haul back down to the miner who gave you the storehouse/warehouse key. He will ask you to save the mayor.


Go down the stairs then drop down.


In the TurboGrafx-16 version there are enemies that drop from the ceiling here.


You're now at a good grinding spot. The blob/slime/whatever they are enemies give out a lot of XP in three versions.
In the Sega Genesis version you will need to grind up to level 4 before this boss fight unless you are extremely good. On the Super Nintendo version you will have to find something to listen to and grind up to level 9. On the Famicom you'll need to be at level 5.
The only exception is the TurboGrafx-16 version where this spot is not good for grinding because of the low number of enemies and amount of XP they give.


On the Super Nintendo and Famicom versions you can now afford the upgrades we previously bought in the other two ports. With the amount of grinding required on the Super Nintendo you should be able to afford a sword upgrade too.


You'll reach another door.


Suggested equipment setup for this boss fight.


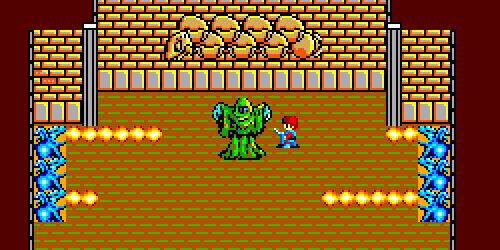
This boss fires flame waves (for lack of a better description) when Adol is far away. They are annoying but not especially strong. They also have a close range lightning attack that shoots from their head. This does massive damage, watch for sparks as a sign to get away from the boss. You'll need to get under them and hit a few jump attacks.
The shield ring makes a huge difference in the Super Nintendo version.
On the Famicom you can actually stand on the ledge next to the boss and finish them off quickly.


You'll get the first statue.


Go right to the next room. There will be another confrontation with Chester.


After that you'll be transported to the entrance for another scene.


Return to the town.


Go back to the lodge for another dialog with Dogi and Elena.
The reason there's no text on many of the TurboGrafx-16 screenshots is because there is voice acting without subtitles.

Upgrade your armor if you didn't previously. On the Super Nintendo you should have already bought the upgraded armor.
Alcaino/Ilvern/Ilberns Ruins
"Ilberns Ruins" is the canon name for this location. It's a better name in that it suggests there was once a town or castle here that was destroyed by a volcano. The Super Nintendo translation is overall accurate but switches 'v' and 'b' in two location names.


Head on over to Alcaino/Ilvern/Ilberns on the map.


There's some nice scenery along the way.


The difficulty amps up right away. The first enemies will completely wreck you in a couple hits. If you jump over them you can hit them with the underthrust attack.


In the TurboGrafx-16 version you'll need to grind up to level 10 before you have a good chance at survival.
On the Sega Genesis you should grind to level 5, which won't take long.
On the Super Nintendo you need to work your way up to level 12 before you can just barely survive.
The Famicom version meets in the middle, you should be at level 6 before going beyond the first room.
A big reason for grinding is that this dungeon has a segment where you can't return to town for a while. If you reach that point under-leveled you'll be completely stuck.

On the Super Nintendo you will have earned enough gold to buy the banded shield which makes a big difference.


Once you're strong enough, keep heading right though the first room then down the stairs.


Continue on through the next door.


You're back outside with the jungle-inspired scenery. At this point you just need to keep heading right.
The Super Nintendo version goes completely bonkers here. When you're outside there is a never-ending swarm of birds attacking. They respawn instantly too. It's like a Hitchcock film.


Low attacks are the safest way to get through the enemies here.


There are birds later on that do a surprising amount of damage. Of course if you're playing the Super Nintendo version you've already been dealing with them.


The next area is tad lighter on enemies.


Just keep on heading to the right for a while.


The next wave of enemies can only be hit while ducking.


The next room is a complete pain. There are enemies and fireballs that chase you.


There is a staircase about halfway through.


Take the staircase.


Get the small shield, equip it, and head back upstairs. This is skippable on the Super Nintendo if you already bought the banded shield.


Continue advancing to the right. In the Sega Genesis version it would be wise to take a detour first and grind up to level 6.
Once you go through this door you will not be able to exit the dungeon or heal for a while. You should create a save file before continuing.


When you get to the blue curtain room there's another cut-scene.


Adol is captured by Chester and thrown into a pit.


Going to the right leads to a dead-end (for now) so head left immediately.
While in the volcano you will be constantly attacked by falling fireballs. You have to watch them launch in the background to see where they will fall. The Famicom version is by far the easiest at this stage because you don't have to worry about these fireballs. Also there are fewer enemies and they are not especially aggressive.


On the next screen you start off on a ledge.


Carefully work your way down. There aren't any spots to heal nearby so you need to avoid the enemies.


When you get to the bottom head to the right.


I wish there was a little more backstory to these ruins.


On the next screen there are flame arcs to deal with. These are missing in the Famicom version which again makes it the easiest here.


The best strategy is just to power through and outrun them.


This boss looks a lot tougher than they are. If you're at the right level you can charge right up and attack them. They'll take off a chunk of HP but you should be able to outlast them. Like practically all other snake-type bosses in the history of video games you can only damage their head.


After the fight you get the stone idol/firedragon amulet.


Now you have to travel all the way back to where Adol first fell into the pit and go right.


A path will form over the previous dead-end.


Keep heading right and up until you reach a staircase.


Elena is in the next room. She and Adol hide behind the door when they hear people approaching. They'll never think to look there.


Then there's another dialog.


Adol notices a strange sculpture in the room they're hiding in.


There is a secret passage behind it.


Always the gentleman, Adol sends Elena back through the monster-infested ruins alone.


Instead of going through the secret passage, this is a good time to recover. Go out through the door and head left to get back to where Adol was captured.
On the Famicom, you should be able to go straight to the boss. You should already have the right equipment and likely didn't take much damage on the way through the volcano.


By this point you should have more than enough gold for a sword or shield upgrade. In the TurboGrafx-16 version I recommend the sword, in the Genesis version I recommend the shield. Also you probably need to stock up on herb/harb.

In the Super Nintendo version you can very rapidly level-up now. You could do this earlier on too. Go to the outdoor area and just stand in place while attacking upwards.

You will kill 4-5 birds every 1-2 seconds. Even if each kill isn't gaining a ton of XP it doesn't matter because the attacks never stop. You should get to at least level 15 before the next boss. It really doesn't take long to get to the maximum level here either.

On the Super Nintendo you'll have enough gold for the banded armor after all the grinding.


Work your way back to the secret room.


Recommended setup for the upcoming boss fight.


This boss can only be hit via jump attacks. He has a pretty large hitbox so it's easier than some of the previous bosses.


In the TurboGrafx-16 version there's a spot where you can camp out to wait for an opening. His fireball attack will always miss here. In the Genesis version that spot doesn't work. Instead you can lure him down to the corner where he can't hit you.
On the Famicom this boss should be defeated before you even have to think about a strategy.


After the fight Adol gets the moon/star stone.


On the way back there's another dialog with Elena and Chester.
Return to Tigre/Tigray Mine
Head back to the town.


Dogi tells Adol he's visiting an old mentor in the mountains.


Talk to the mayor. He will give you the time ring and key to the last locked door in Tigre/Tigray mine.


Go back to Tigre/Tigray mine and take the bottom left exit from the large room.


Go through the door.


These poison plant things are a new enemy that deal heavy damage. Their tentacles (or whatever) have a long reach. You need to approach them carefully until you have better armor.

On the Famicom this is a good spot to level-up to 7.


You'll eventually reach a break in the platform. You can continue left or down from here.


Go left first.


Get the crystal at the end of the tunnel.

You'll need to do a little more grinding on the Famicom version before going deeper. In this area it won't take long to get to level 8.

On the Famicom you'll now have enough gold for an armor upgrade.

Your equipment on the Famicon version should be about here now.


Go back and crawl under the broken platform.


It's kind of a deathtrap underneath. You have to be careful not to land on one of those plants.


After descending, head left until you reach a staircase.


There's a dialog with the miners about a treasure chest that won't open.


Conveniently Adol has a random item that opens it for reasons.
On the Super Nintendo the chest just opens like any other one, no dialog explaining how.


Inside the treasure chest is the tablet.


Head left until you reach a staircase.


Skip the stairs and keep going left.


Get the plate mail. On the Super Nintendo and Famicom this is skippable if you already bought the banded armor.


On the other two consoles, your weapons and armor should roughly be setup like this now.


Head down the stairs to a large room.


There are enemies on ground but the exit toward the top left.


On the TurboGrafx-16 it's a little tricky to reach the exit. You need to get up on high ledge on the right side and blindly jump. The other versions have an extra platform that makes it 100x easier.


There's a small platform you need to hit. From here you can work your way up.


Down the stairs is another boss. In the TurboGrafx-16 version it is easily the most difficult boss in the game. Maybe there's some trick I haven't figured out. The surest thing I've found is just grinding up here.
In the TurboGrafx-16 version Adol should be at level 12 at this point. At that level the boss will destroy you in 1-2 seconds.
In the Genesis version Adol will be at level 8. The boss is beatable at level 8 but one more level helps.
In the other two versions you're already at a good level for this fight.


In the TurboGrafx-16 version, enemies in the previous area give a lot of XP so grind up to at least level 13. On the Genesis it will take longer, but getting to level 9 is a good idea.


In the TurboGrafx-16 and Genesis versions you can now afford some upgrades. Go back to town and upgrade your shield.


The crystal you just found can be used to brew a new potion that restores ring power.


Buy the medicine. It's not terribly helpful for the power, shield, and time rings. It's extremely helpful for the heal and protect rings later on.

In the TurboGrafx-16 version you should have just enough gold to upgrade armor too.


Recommended setup at this point. Note, in the TurboGrafx-16 version you can get by skipping one of the shield upgrades. If you really want it for your collection you'll have plenty of excess gold toward the end of the game.

In the TurboGrafx-16 version it's possible but very difficult to defeat the boss at level 13. Grinding up to level 14 make a huge difference if you have the patience for it.


On the TurboGrafx-16 I don't really have words to describe how much I dislike this boss fight. They're wedged up in the top corner and are difficult to hit. They're guarded by falling rocks, fire that shoots out of the crevice under them, and to top it off.. they have these fireballs circling them that teleport Adol back a few feet. You have to camp out and wait for a break in these three defenses to land an attack. It's possible to land on the ledge directly under the boss and score a couple hits. You get what feels like 5 frames before you're teleported back. You'll have to use healing items in this fight unless you're incredibly good/lucky. The amulet is helpful too because it scores a couple free hits on the boss.
The Sega Genesis version is bit easier because there are fewer things attacking you. Also with the power ring the boss takes a large amount of damage.
On the Super Nintendo version you can get on the ledge with the boss and finish them off quickly.
In the Famicom version, this boss is kind of a joke. The fireballs don't teleport Adol back and only deal light damage with the Banded Mail equipped. It only takes a couple direct hits to finish him off.


After the fight Adol gets the light/flash statue.


Head back out for another dialog.


You'll be told to take the statues to the mayor.


There's a confrontation at the mayor's house.
Eldarm/Eldam Mountains/Mt. Seko
After the confrontation restock on healing items.


Next stop is Eldarm/Eldam Mountains/Mt. Seko to find Dogi and his old mentor.


The scenery is nice here too. Like the previous areas you can heal at the entrance.


This again is a very linear area. There are some new enemies than can easily be mistaken for a rock. They will jump at you so proceed with caution.


You'll reach a cave.


The difficultly ramps-up again here. The enemies in the cave deal a lot of damage.


In the TurboGrafx-16 version you can quickly grind to level 15 here.
On the Genesis version reaching level 10 won't take long.
On the Famicom version level 9 is a good goal here.


In the TurboGrafx-16 version you can put on a podcast or whatever and grind to the maximum level in about 30 minutes. It's kind of crazy that you can reach the maximum level around 60% of the way through the game. The original Ys works like this on most platforms too where you're typically at the highest level before entering Darm Tower.
(yes, of course you can reach the maximum level on the Super Nintendo around 30% of the way through)
If you have the time, getting up to level 11 on the Genesis helps with the next two boss fights.
Meanwhile on the Famicom you'll now be able to afford the banded shield.


Move on to the next snowy area.


Dogi greets Adol when he arrives.


There is a dialog with Dogi's mentor.


Adol is given the banded sword/slayer which you should equip.


Move on to the next area to the right.


This part is a long climb up a mountain.


Those rock enemies are back, proceed with caution.


The next boss is not very strong but they often fly out of Adol's attack range. This is especially the case on the Super Nintendo where the boss is a total coward. In that version you will drain your ring power long before winning this fight.


Get to the highest point on the ground and jump attack when you can.
On the Super Nintendo you'll have more success going all the way to the right and attacking from the highest point you can reach.


When the fight is over, Adol gets the flame staff/judgement staff/rod of judgement.


Take the flame staff/judgement staff/rod of judgement back to the stone statue to the left. This is a case where the bad translation kind of makes more sense. A flame staff that melts the snow seems more right. Whatever, let's move on.


You can rest at the house to recover HP if you need to before the next boss fight.


Head down the passage that opened with the flame staff/judgement staff/rod of judgement.


This is a short cave that leads directly to a boss fight.


Recommended setup for the next fight.


This is an easy boss, just jump and hit them in the head while avoiding some attacks.


After the fight Adol gets the dark statue. Everyone agrees with that name which is nice.


Chester shows up out of nowhere.


There's an avalanche, Adol and Chester are stuck for a moment.


Dogi delivers on his nickname by smashing down the rock wall.


Dogi and Adol head back to town.
Tearful Twilight
We reach a small interlude in the story. A tragedy has befallen the town, setting-up Adol's invasion of Valestine Castle. This part of the game has my favorite song from the soundtrack. It was composed by Mieko Ishikawa who worked on soundtracks for many early Falcom games before moving into a production role. Just wanted to take a second to call that out, let's resume our scheduled programming.


Uh-oh, something bad has happened while Adol and Dogi were away.


Talk to the villagers and get the Heal Ring.


You learn that some number of villagers were taken to Valestine Castle. Those who played Falcom's Trails of Cold Steel series will recognize the name.
On the Super Nintendo they went with "Ballacetine" which perhaps is a valid phonetic translation it but not nearly as cool sounding.


At this point you should have enough gold to buy all the equipment and items except for the final slots.


Talk to the mayor, this unlocks the ability to travel to Valestine Castle.
Valestine/Ballacetine Castle
"Valestine" is obviously the correct name since (again) it is used in later Falcom games. This is the worst thing in the Super Nintendo translation.


Go to Valestine Castle.


Adol is looking out for Elena again.


Enter the castle and proceed to the first staircase. There are many, many staircases in this dungeon. This whole castle is nothing but linear hallways and staircases. It feels like a maze but there's only one path.


The enemies here will cause a lot of damage until you have the final armor. Crawl and attack to avoid getting hit.
In the Sega Genesis version there are also enemies that launch from the bottom of the screen. They are a pain to avoid.
In the Super Nintendo version you should have no need for XP or gold and dodge all the enemies.


Proceed to the next staircase.


On the next floor is the first appearance of these giant plants that shoot sparks. They look more powerful than they are on the TurboGrafx-16 and Genesis.
On the Super Nintendo their attacks will completely destroy Adol. One hit knocks off almost 80 HP even with the best available shield & armor.
These enemies are missing on the Famicom version.


Pass through the room and up another set of stairs. From here on out there are suits of armor in the background that also attack you but you can't attack them.


The next two enemy types also deal considerable damage right now. In the TurboGrafx-16 version, jumping while attacking down is a good strategy for dealing with them. In the other versions they are weaker and you're better off attacking them low.


More stairs but with a twist... floor spears.

In the Famicom version, this is a good place to grind up to the final level.


Hallway, stairs, floor spears...


And another one...


One more floor of these to get through. In the Genesis version there are a couple spots where enemies are right on top of the staircase when you enter.


The floor spears get ludicrous after a while.


Eventually there's a fork where you can take some stairs up or proceed through a doorway.


The doorway is a dead end for now. Backtrack and take the first stairs you see up. Or just go up them in the first place.
This is another awesome typo on the Sega Genesis. It makes me think of Star Wars.


After going through a few more flights of stairs and hallways you'll find steps that go down. Take them to get the battle shield then go back up.


Equip it, this will help with damage quite a bit.


In the Sega Genesis version you'll want to grind-up to the maximum level now. The next boss is just barely beatable at a lower level.
Meanwhile, in the Super Nintendo version watch out for this enemy standing over the stairs. You'll need to equip the shield ring for a couple seconds.


Continue on for another boss fight. This isn't tough either. The boss takes damage quickly and the whole fight should be under a minute.


After the fight Adol gets the red arm band/garnet bracelet.


Go back down to the statue that was blocking your path. The red arm band/garnet bracelet will break its barrier.


Continue on to the next room.


The same type of rooms and enemies repeat.


Don't miss the staircase going down.


Get and equip the battle armor then head back upstairs.


Keep going until you reach the next boss.


There isn't much to this boss. When they charge jump and attack downward. They will stop to shoot a stream of fire which you can jump over. In the Sega Genesis version you can fight them head-on and if you're at maximum level with the best available equipment their life meter will drain before yours.


Keep going to the next building.


Inside the chapel is another dialog.


After the dialog an underground passage is opened.


Take the stairs down.


The next area has quite a few enemies, try to run through it without taking too much damage.


There are more stairs and giant plant enemies along the way (except for the Famicom version).


Finally, the last staircase.


This looks like the previous statue but is really a boss. Back off a little before he starts attacking.


This is not a very tough boss. In the TurboGrafx-16 version, jump over them while trying to score a downward attack. In the Sega Genesis version just crawl and attack them directly, with the power ring equipped you will finish them off in a couple seconds.


In the TurboGrafx-16 version, the objective is to get behind them where you can score a couple free hits.
In the Super Nintendo version attacking them from behind causes them to teleport away. Instead you need to keep attacking them low from the front.


After defeating the boss Adol gets the prison/dungeon key.


Backtrack to the prison gate.


Free the prisoners, a dialog will follow.


Go back to where you fought the last boss and head right to enter the clock tower. If you missed the battle shield or armor go back to get them now because the enemies in this area will absolutely destroy you without both.


Head right to the ledge.


Jump onto the gears.


Work your way up to the top.


Keep working your way up to the top left corner.


Get the protect ring. When this is equipped Adol takes no damage but his ring power drains very quickly. I found it useful in the last boss fight.


Stay as high as you can and head to the right.

In the 16-bit versions the exit is on the top but on the Famicom it's at ground level.


You'll reach a door to the second room in the clock tower.


This time you need to work your way toward the top right corner.


Get the flame sword and equip it.


Getting out of this room is a pain. There are a set of chains you can ride, get on the right one.


Then you have to jump onto this gear and continue going right. The Genesis version is easiest of all here.


Then go through the door.


You'll again have to use a set of chains to get through the next area.
This section is missing from the Famicom version.


Ride to the top of the area.


Then start heading right, while trying to stay as high as possible.


Use the door in the top right corner.


Wait for the chains to descend. In the Genesis and Super Nintendo versions there's a brief dialog and even briefer fight first.


In the TurboGrafx-16 version hop across the chains to reach the top. In the other versions there is only one chain.


Alright, we're finally at the top floor.


Walk through the bell room.


Continue across the bridge.


There is a dialog followed by a boss fight.

In the Super Nintendo version you'll need to equip the protect ring because the boss will obliterate you in about 2 seconds without it.


With the battle gear equipped this should be easy. You can get right on top of the boss and attack upwards. Their life bar should drain faster than yours.


Adol gets the statue of many different names after the fight.


Elena gets into a bit of trouble after the fight.


This causes Adol to have an existential crisis.


He's in a dark place now.
Galbalan/Demanicus Island
Now we're back in the city.


The townspeople encourage Adol to hang around after his work is done.


Talk to the mayor to get permission to fight Galbalan/Demanicus. "Galbalan" is the canon name but I prefer "Demanicus".


The mayor will give Adol the fire jewel. The typo in the Genesis version is on-brand for the translation. Quite an interesting assortment of names all around here.


You should have every item in the game by now, with more than enough money to buy anything you're missing.


Go to Demanicus'/Galbalan's island.


There's a sailing scene, this is before Adol's bad luck with boats began.


The last statue opens the door to the dungeon.


The dungeon is short but maze-like. In the first area you need to work your way down and to the left. The skeletons deal non-trivial damage and it's best to crawl & attack.
The dungeon is roughly the same between the three 16-bit versions. The Super Nintendo one is about 10x more difficult because the enemies take what feels like 2 million hits and do 60 HP of damage per hit. They also respawn very quickly. The last segment of this game on the Super Nintendo is horribly unfair.
The Famicom version is confusing because you have to warp by pressing up next to these crests on the wall. This is explained exactly nowhere. I found it out after walking in circles and trying anything else. After a series of warps you'll end up at the exit. Here's the first warp point.


It's a good idea to attack downward when dropping because enemies will pop-up out of nowhere.
This is the second Famicom warp point.


Keep working your way down and left through the corridors.
This is the third Famicom warp point.


At one point you have to take a blind fall and press against the left wall to land in a passage. If there are skeletons right on edge you're better off trying again.


This is the exit on the Famicom version. As for the other three, just keep plodding through the corridors while trying not to take damage.


We finally reach the court of columns from the intro.


The second fight with Garland is the same as the first. In the TurboGrafx-16 and Super Nintendo versions Adol doesn't heal after the fight. This makes the upcoming last boss fight much more difficult.
This is the last chance to save your game (not including save states).


Walk up a long flight of stairs.


Chester is waiting at the top.


There's a scene with Elena and Chester.


Take the elevator to the last boss fight.


There's a little animation that's reminiscent of the Ys II intro.


In the TurboGrafx-16 and Super Nintendo versions you'll probably need to use the herb early in the fight. Starting off with the power ring and amulet in the TurboGrafx-16 version is a good idea.


In the TurboGrafx-16 version this boss is a total nightmare. He drains your life very quickly. The best strategy I found is to get in the corner because there will be fewer things flying at you. Then keep jumping and hacking away.
As bad as the TurboGrafx-16 version is, it's like Mickey's Adventures in Numberland compared to the Sega Genesis version. If you touch the boss at all it deals massive damage. At the start you have to chop off his hands. Each takes what feels like 100 hits and the power ring makes no difference. Chopping his hands off deals literally no damage to the boss.
At this stage of the fight the Super Nintendo version is the same as the Genesis.
The Famicom version is easiest because the mirror works on Galbalan. When he swoops down use the mirror to freeze him then attack upwards. You should be able to take out each hand with one mirror use to spare.


In the TurboGrafx-16 version once the necklace has been used, and the life meter nearly depleted, try switching to the protect ring to finish him off. You'll only get a couple of seconds to work with.
In the Genesis version you have to very precisely hit the yellow part of his belly. 50%-70% of your swings will appear make contact but miss. If you touch 1 pixel of this boss it's about 1/5 of your life gone. Using rings doesn't help because there are so few openings to attack. Your ring power will drain before you've knocked off 10% of his life bar. Every time the boss moves he stops for a few seconds. You have about 1-2 seconds to try and hit him before he shoots fireballs. The fireballs only hit directly underneath him. Every 4-5 rounds he launches a different fireball attack that shoots across the bottom. You can duck that since it's aiming for your head. Even with massive save state abuse expect this fight to take 30 minutes. When he's down to about 1/8 health you can put on the protect ring and fight him more aggressively.
The Super Nintendo version is completely unbearable in the second phase. Like the Genesis version you have to hit the orange-ish belly. However, it is only exposed when Galbalan launches two specific attacks. For one of them you have no chance of hitting him except with the amulet. For the other there's about 1 microsecond of an opening. Unless you put the power ring on for that microsecond you'll do almost no damage.
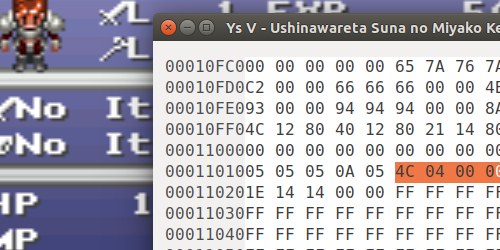
Instead, here's what I recommend... That save file you made after fighting Garland. Open it up in a hex editor and set address 0x390 to 0x7F. Values >0x7F probably work but I didn't feel like finding out if the game interprets them as negative. What's at address 0x390? It's the number of uses your amulet has in save slot one. Change to 0x590 for save slot 2, 0x790 for save slot 3, and so on. Then when the boss briefly exposes his weak point just mash on the A button to use the amulet a few times. Yeah, this is obviously cheating but the game itself is cheating with this boss I feel.
On the Famicom just get under Galbalan and let him swoop down to attack you. You'll take damage but also be able to hit him many times. This fight will be over before your ring power is depleted.
Ending
Let's wrap-up by comparing the ending scenes. Hit the back button now if you don't want it spoiled.


Adol encourages Elena to leave the crumbling island.


Chester sacrifices himself.


The island is destroyed.


Back in town the next morning, Adol suggests leaving before the villagers awake.


Despite not wanting to be seen leaving, Adol can still talk to people.


Roy/Bob/Robert and his mother are up early. Roy/Bob/Robert has some regrets it seems.


His mother is confused by the situation.


The guard never sleeps.


Dogi and Elena say goodbye.


Adol gives the guard his life story.


Dogi suggests Adol says goodbye to Elena, Adol is not interested.


The rest of the ending images are in order and where possible I'll line-up similar ones. The 16-bit ones start with images that evoke the start of a new journey.


Even though the perspective is different, the Genesis and TurboGrafx-16 versions have Adol & Dogi heading down a wooded path.
On the Super Nintendo, Elena catches-up with them.


In the TurboGrafx-16 version I think Adol is looking back on the town.
In the Genesis version there's a shot of the wrecked boat that presumably Adol and Elena escaped on.
On the Super Nintendo we have the nightmarish rendition of Adol again.


In the TurboGrafx-16 version it seems Adol is reflecting on his adventure, starting with Elena.
We'll get back to the Genesis version in a little bit.
On the Super Nintendo there's some kind of dialog.


In the TurboGrafx-16 version there is then a flashback to Chester.
On the Super Nintendo Adol & Dogi wave goodbye.


In the TurboGrafx-16 version there is a flashback to meeting the townspeople (I think).
On the Super Nintendo Elena is sad.


The Genesis and TurboGrafx-16 versions both have a flashback to the final boss fight.
The Super Nintendo tries to get all deep and inspirational.


In the TurboGrafx-16 version Elena is looking for Adol & Dogi while on the Genesis we see Adol looking like a Persona character.
I'm only including the credits for the Super Nintendo version because they are neat. Each screen is a flashback to an event in the story.


In the Genesis and TurboGrafx-16 versions we have Elena either calling out or walking nervously.
On the Famicom Elena starts walking toward Adol & Dogi but stops.


In TurboGrafx-16 version Adol & Dogi see Elena in the distance while on the Genesis version they meet.


There are some odd renditions of Adol in these games and here are two of them. In the Genesis version the credits roll over this last image. The Famicom one surprisingly looks best.


Meanwhile on the TurboGrafx-16 version we see places Adol & Dogi may be heading.


This is the "there's a whole big world of adventure waiting" ending screen on TurboGrafx-16.
The Super Nintendo version ends with an image of Elena with a color fade.


After the credits, the TurboGrafx-16 has a "to be continued" screen. Ys IV was 3 or so years after this but clearly they were thinking about it.
The TurboGrafx-16 and Super Nintendo aren't all that different in the end.
Ranking these ports
After playing them all in a short timeframe I have a better idea of how to rank them now:
| First | Second | Third | Fourth | |
|---|---|---|---|---|
| Graphics | Sega Genesis | TurboGrafx-16 CD | Super Nintendo | Famicom |
| Music | TurboGrafx-16 CD | Sega Genesis | Super Nintendo | Famicom |
| Difficulty Balance | Famicom | TurboGrafx-16 CD | Sega Genesis | Super Nintendo |
| Localization | Famicom | Super Nintendo | TurboGrafx-16 CD | Sega Genesis |
| Intro & Ending | TurboGrafx-16 CD | Super Nintendo | Sega Genesis | Famicom |
| Overall | TurboGrafx-16 CD | Sega Genesis | Famicom | Super Nintendo |
Tags: Falcom TurboGrafx-16 Sega Genesis NES Super Nintendo